

Last Updated on February 26, 2022 by Practical Astrophotography Staff
BASIC IMAGE ENHANCEMENT USING CURVES
Abobe Photoshop is a powerful and versatile program that is well-suited for astrophotographers. However, precisely because of its many functions, mastering it can be an overwhelming task. Still, there are several basic techniques that one can easily use to enhance what may initially appear to be a very uninteresting image. You can accomplish much with the use of the Curves and Levels tools alone.
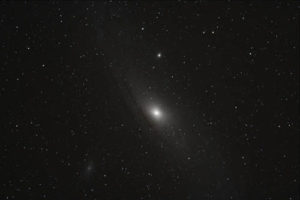
The Before image is a median combination of four five-minute exposures of M31 taken with a Takahashi FS-102 and Canon 350D (Digital Rebel XT). It appears that there is not much information in the frame. However, after a few basic steps, you can extract much detail from this image. This is evident in the after image left.
1.) First, open your image and, if it is not already a 16-bit image, make it so by clicking on the Image > Mode menu option. Working with 16-bit images allows us to stretch them without losing detail across the tonal range. You will need to convert the image to 8-bit mode if you want to save it for the web as a JPEG.
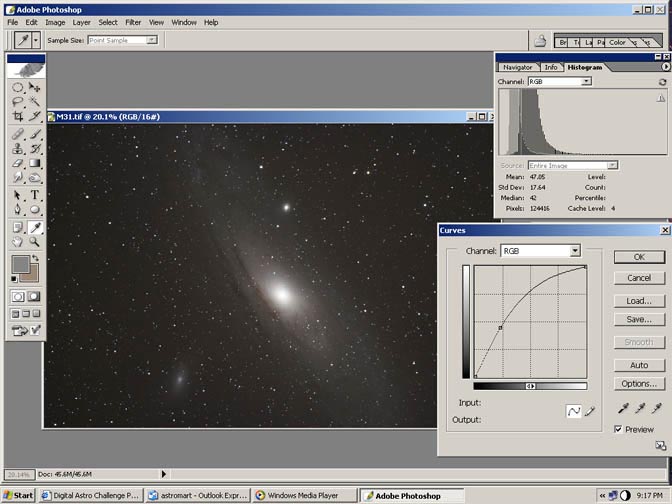
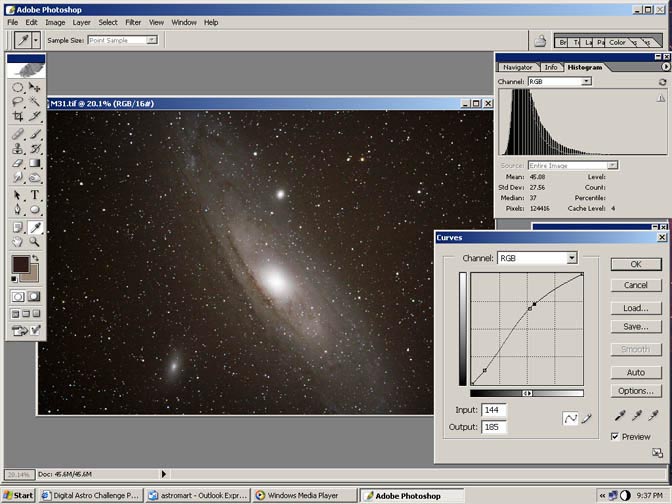
Begin with simple adjustments in the Curves. To access this dialogue box, go to Image > Adjust > Curves. You actually have great control over your image with Curves. You can adjust up to 14 different regions in your image’s brightness range. For example, you can make adjustments to the shadow regions of your image without affecting the highlights. The x-axis of the Curves graph represents the input levels; the y-axis represents the output levels. Click on the line to create an adjustment point; drag the point to make your adjustments. If you would like to remove an adjustment point, simply drag it to one of the corners of the graph.
For the moment, we will just make a simple adjustment by clicking on the diagonal line and dragging it upward. When the Curves window is open, you can place the cursor over the part of the image you would like to enhance (in this case the spiral arms of the galaxy) and left-click the mouse. This will show you the place on the Curves line that you will want to raise. Another option is to Control/click on the image; this will actually place an anchor point on the Curve line. You can then either physically drag it upward or use the arrow key to do so (holding the Shift key while pressing the arrow increases the increment ten-fold).
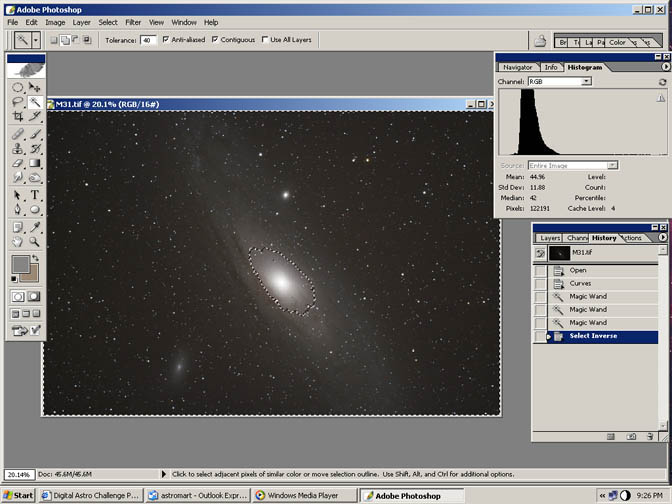
Before making any additional adjustments, it is a good idea to mask the core of the galaxy so it does not get burned out in the process. One way of doing this is to use the Magic Wand to select the portion of the image you wish to preserve. You may have to experiment with the tolerance setting. You could also simply add to the selection by Shift – clicking on the image. Once you are generally satisfied with the selected area, invert your selection (Select > Inverse). The selection should appear similar to the screen below.
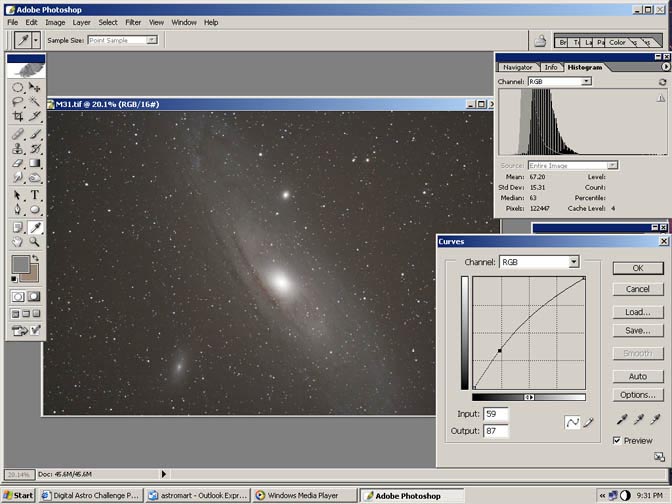
You will need to feather your selection in order to avoid any abrupt boundaries in the image after future adjustments. Rather than simply guessing about what value to put in the Select > Feather dialogue box, I would suggest switching to Quick Mask mode. You do this by clicking on the icon in the Toolbox area (it’s the box with a circle inside of it, below the foreground/background color selector). This will change the masked region to a translucent red hue. Now go to Filter > Blur > Gaussian Blur and adjust the Radius until it smoothly covers the core region (see the screen below). Click OK.
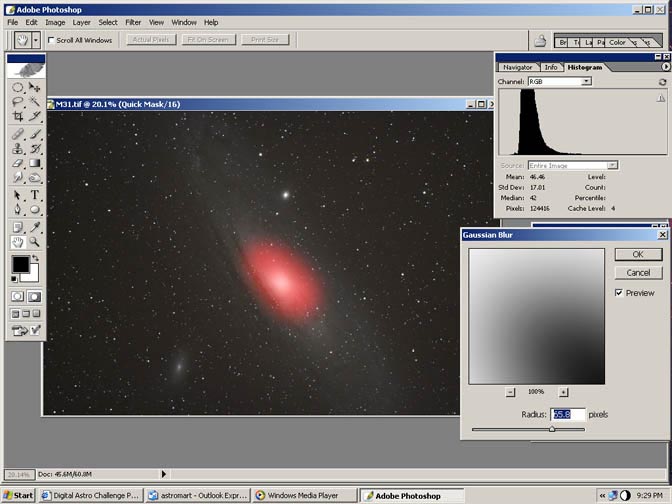
You will now need to switch back to Standard Mode (the box just to the left of the Quick Mask button). If you wish, you can hide the selection lines by clicking on View > Extras. After making another adjustment with Curves, remember to deselect your selection.
After deselecting, do another application of Curves. Depending on the image you are working on, it may be helpful to make a number of iterations of this process: isolate the core, use Curves, deselect, use Curves. After doing so, you may notice that the background has become quite light. To adjust this, we will use — you guessed it — Curves.
Rather than changing the shape of the Curves line, we will keep it linear but change its slope. Click on the point in the extreme lower-left corner and drag it to the right until the far left region of the histogram reaches the y-axis (see below). One great feature of Photoshop CS is that it allows you to view the histogram of an image as you are working on it. This makes an adjustment like this very easy. With earlier versions of Photoshop, you will need to view the histogram after making your adjustment. In any case, it is extremely important to not clip the histogram (i.e., cut off its tail). This will cause us to lose valuable information in the shadows (a common mistake with many processed images).
Now we are almost finished. We will just need some fine tuning of the image. Here’s where you can get more creative with Curves. Rather than simply raising one point on the line, you can add a number of anchor points: one for the background area and another for the highlights. Dragging the background point down will darken the background without any risk of clipping the histogram. Creating a variation of an S-shaped essentially increased the contrast of the image (see below).
Whether working with one anchor point or several, it is sometimes a good idea to add another anchor point to the Curves line just above another point. Your goal is to make the upper portion of that line more linear. This preserves more of the detail in the brighter portions of the image. Such an adjustment can be seen below in the final Curves adjustment.
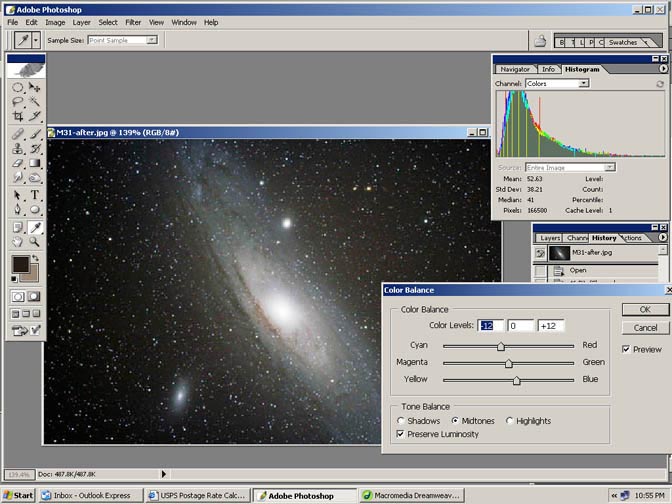
Before saving your image, you may need/want to make some additional adjustments (like another application of Curves). In this particular case, the color needed to be better balanced. Using Color Balance easily remedied this problem as can be seen in the histogram below.
Of course, there are many other final adjustments that you can make to your image, including noise reduction. There are also other ways to preserve detail in the bright core
of images such as the Orion nebula. This involves taking separate exposures of differing lengths and combining them via a layer mask. But that would be another tutorial. +


