

Last Updated on February 20, 2022 by John Rista
Welcome to my tutorial on using PHD2 and the bookmark technique to dial in extremely precise polar alignments.
Many of you may already be aware of the fact that PHD2 can be used to perform a polar alignment. What you may not be aware of is that polar alignment with PHD2 can be extremely accurate and that it can be done without necessarily having a line of sight on Polaris. For those of you who have an obstructed view, or live near the equator, aligning with PHD2 is a free, easy way to achieve very accurate polar alignment very quickly.

I am also sure some of you have tried PHD2 drift alignment and given up on it. You found it clunky, difficult to avoid cycling back and forth between one bad alignment and another, etc. You may have even put money into another tool to solve your alignment problems, tools that may rely on the (potentially inaccurate or imprecise) pointing accuracy of your mount for “iterative” alignment. This tutorial aims to introduce you to the key feature of PHD2 that alleviates these problems, making polar alignment easy, fast, and consistently effective…at dialing in VERY accurate PA: bookmarks.
If you’re like me, you’ve noticed the bookmark feature of PHD2 throughout your time using it, but never realized with a use for them. While trying to improve my PA a few weeks ago, early August 2014, I was struggling with PHD2 drift alignment while trying to move the guide star the right amount, relative to its previous position. It hit me at that point that bookmarks would be a perfect way of gauging how far, and in what direction, I needed to move the guide star, in order to properly refine my alignment.
The key benefit of polar aligning with PHD2 is it requires only the adjustment of your altitude and azimuth adjustment knobs or bolts. This is a benefit, in that it means you can dial in an accurate polar alignment without having to rely on the pointing accuracy of your mount (which may be limited to 1-2’). This alignment technique does not require iteration between two stars and therefore does not require you to move the mount at all. At least, not beyond the initial pointing towards your alignment star (near the meridian and CE for azimuth, or horizon and CE for altitude). Once pointed, all adjustment is done purely with the alt/az adjustments on the mount.
All of the frustrations with PHD2 drift alignment can be eliminated by using bookmarks. By marking the current position of the star before each adjustment with alt/az knobs, you have a clear gauge of where the star was, and after a couple of adjustments, you know exactly what effect turning your adjustment knobs one way or the other has on the star position relative to where it was. This takes a lot of the guesswork out of PHD2 drift alignment, which is probably the greatest source of frustration, and a key reason why it can be just as time-consuming as other methods. Bookmarks also help you define a shrinking range as you add more bookmarks, guaranteeing that, somewhere between two of those bookmarks lies a perfect polar alignment.
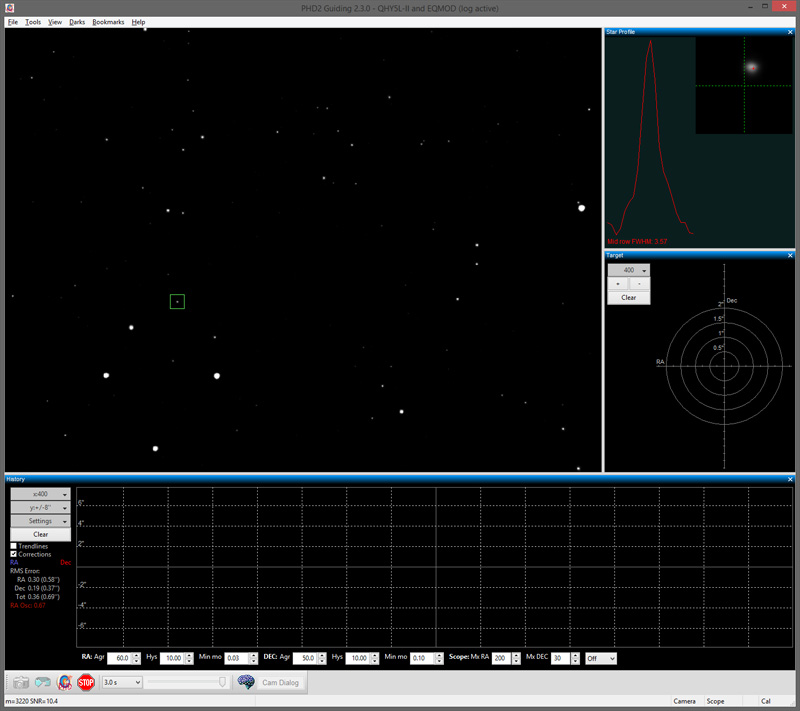
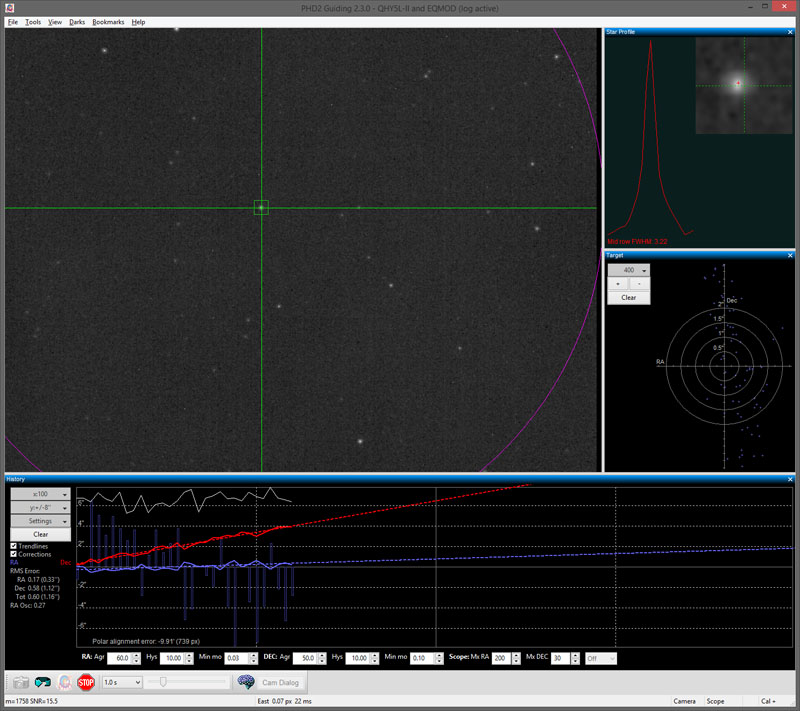
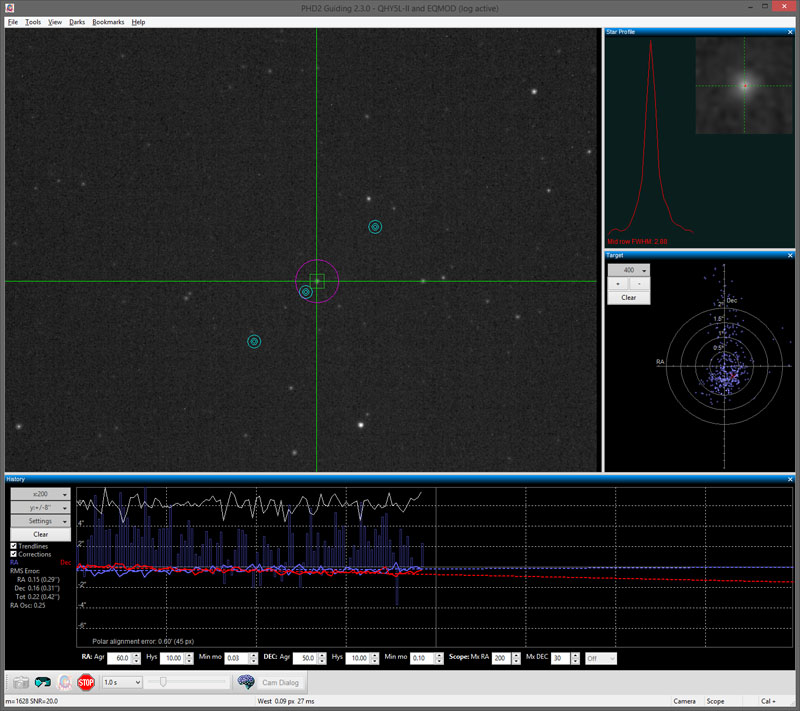
With just a few iterations of drifting, placing bookmarks, and making smaller and smaller adjustments, you can dial in a polar alignment less than 0.5’ (<30”) off the NCP, and if you are persistent, within a few more iterations you could dial in a polar alignment less than 0.1’ (<6”). With a little bit of practice, performing fast, highly accurate polar alignment to ten arcseconds off the NCP can be achieved in *less than 15 minutes.* This screenshot shows the kind of tracking and guiding performance that is possible with a very accurate polar alignment:
Getting Started
First things first, you need to get PHD2 ready to use for drift alignment. You will need to start it up, point at a star near the meridian and celestial equator (for azimuth alignment, which the drift align wizard defaults to on startup), and calibrate PHD. Calibration must be performed before doing drift alignment. If you forget to calibrate, the drift align wizard will only momentarily display a message in the status bar indicating that calibration is required for the wizard to work.
After calibrating, choose a high SNR star (over 10) within the middle quarter of the frame. It is important to choose a star here, as when you start adjusting, the star can move in any direction in the frame, by as much as a quarter of a frame initially. Picking a star near the edge could result in adjustments moving the star right out of the frame.
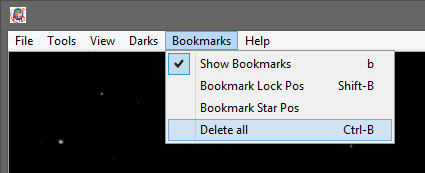
Before starting the drift alignment wizard, you should make sure that bookmarks are enabled (shown), and that you delete any existing bookmarks. This will assure that you don’t end up confused about which bookmarks mean what (especially if you had tried to drift align earlier, and ended up needing to repoint the mount.) It probably goes without saying, but saying it anyway for good measure: Make sure you are pointed a bit ahead of the meridian, and any of your mount’s stop limits, so you have time to perform drift alignment without running into a meridian or horizon limit during the process. It also helps to make sure that there are no trees or other obstructions that might find their way into the frame while your aligning.
Finally, set your exposure time to 1 second, so you can see an immediate response to any adjustments you make. It also helps to set the history period to 200 ticks, and the y axis to 8. I’ve found that these settings are best for early drift checks…later on, when you require longer drift checks, you might want to up the period to 400 ticks.
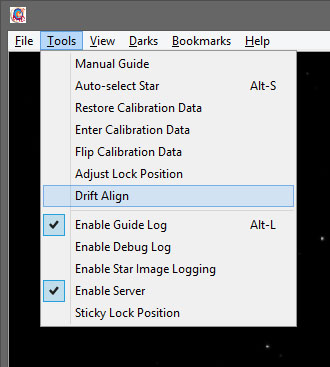
Once all the above things are done, you’re ready to start the drift alignment wizard. You can find it in the Tools menu, Drift Align. You should see a window like this appear when clicking on that menu option:
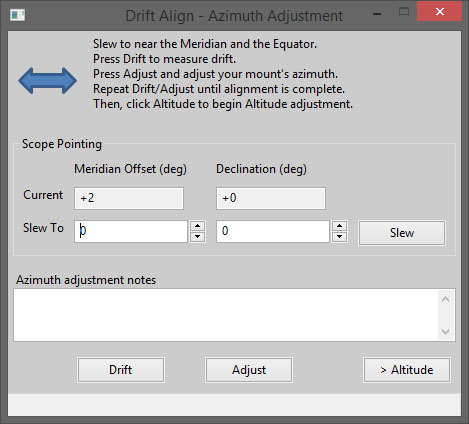
The Scope Pointing feature will only be accurate if you are using ASCOM Pulse Guiding. If you are using an ST-4 cable to connect your guide camera to the ST-4 guide port on your mount, the information here will not be accurate. If you are using ASCOM Pulse Guiding, you can even control your mount from within the PHD2 drift align window, and it will show you how close you are to the meridian and celestial equator, making it very easy to get right on top of it for really good drift check.
Drifting and Adjusting
Click the “Drift” button, and let PHD start the drifting process. PHD will
automatically disable declination guiding, however, it will guide in RA. Let PHD drift for a good 20-30 seconds…anything less, and the information is bound to be highly inaccurate. Especially early on in the drift alignment process, the first 10-20 seconds of drifting will be erratic, and the indicators (trendline and the pink circle around your guide star) will jump around, possibly quite wildly, until they “settle” and normalize around a given trend.
Depending on your luck, you may find that your polar alignment is quite good, or you may find that it is quite bad. As a general rule of thumb, if your drift is out by more than about 8’, then you will need to tighten it up a bit before actually using bookmarks. The reason for this is an 8’ or larger will often require moving your chosen guide star right out of the frame (larger sensors, like the Orion SSAG, may be viable up to 10-15’). I find it’s best to try to get an initial polar alignment between 2-5’ with whatever initial routine you use, as this is usually sufficient to keep the guide star within the frame throughout the rest of the process.
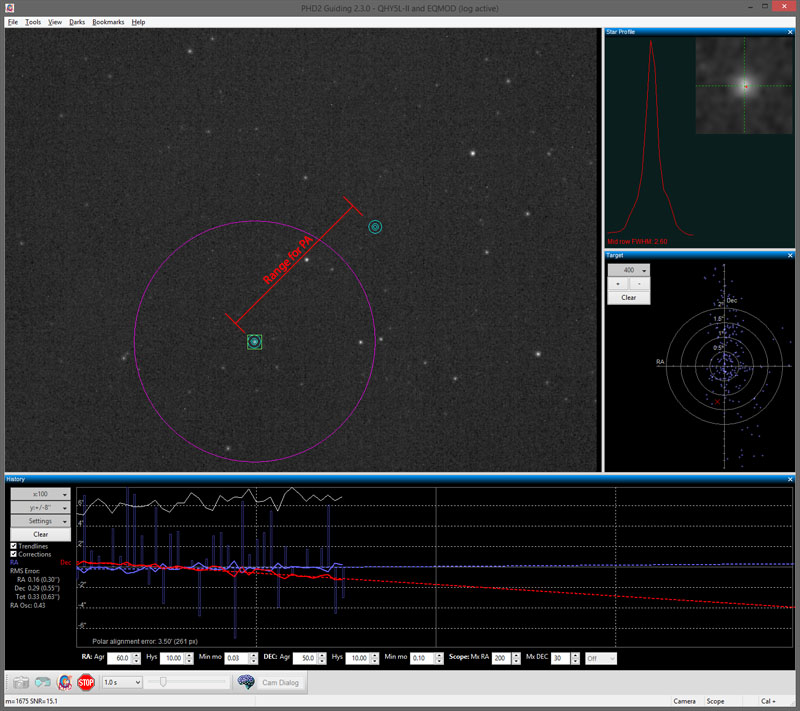
Once you know the direction your guide star is drifting, and by how much, click the “Adjust” button in the drift align window. BEFORE you actually make any adjustments, click back into the PHD window, and on your keyboard type SHIFT-B. This will create a bookmark at the current position of your guide star:

For a better view of what a bookmark looks like, it’s the cyan-colored set of circles within the green guide star box:
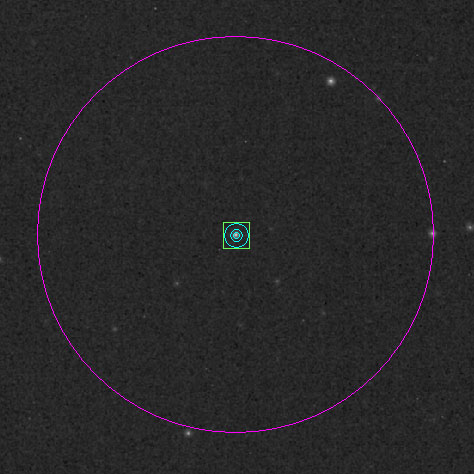
Now you can make an adjustment with your azimuth knobs. You will see a pink circle around your guide star. This circle will follow the selected star once you hit align. This is supposed to be an indication of how far you need to move the guide star (with the azimuth knobs, not by moving the mount in RA or DEC!) in order to refine your polar alignment. It should be noted that this circle is only accurate when you are VERY close to the meridian/CE junction…within +/-5 in meridian offset and declination in the “Scope Pointing” box of the drift align window. If you are not using ASCOM Pulse Guiding, it may never be accurate, regardless, since it’s accuracy depends on PHD having an accurate reading of where the mount is currently pointing.
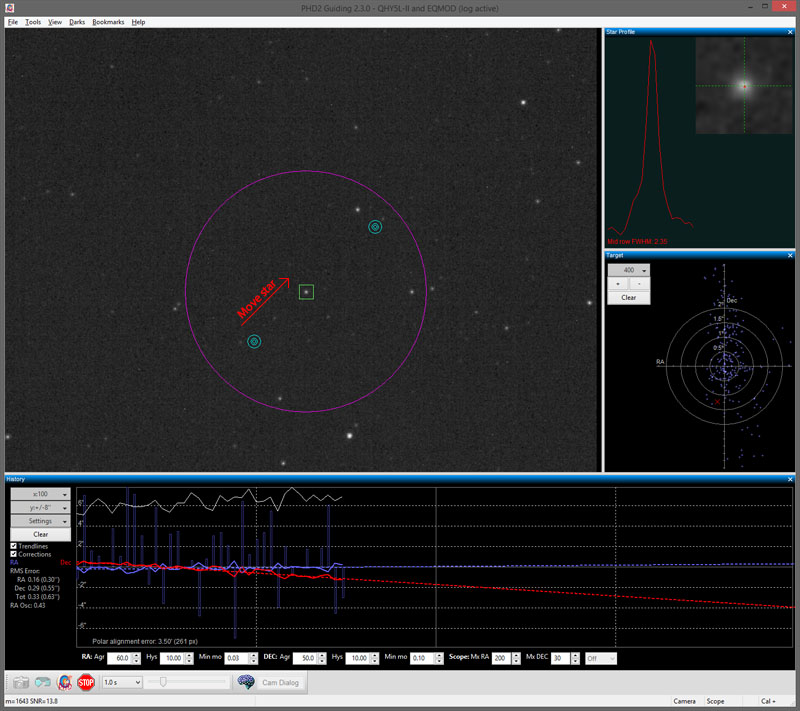
If you are close to the meridian/CE junction, you can move the guide star from the center of its bookmark to the edge of the pink circle, and that should dial in a fairly decent PA. If you are not close enough to the meridian/CE (which is probably the case, if you need a good 10-15 minutes to align, your probably at 0 DEC, and off the meridian by 15 degrees), then you will want to move the star about a quarter of the size of the frame at most. I have found that moving the star enough that it’s drift “switches sides” helps you gauge, with pretty high accuracy, where to move the star on the second move to quickly dial in a good, sub arcminute polar alignment.
To clarify, if you started out pointing to the east of the meridian, drifting two arcseconds in the negative (red plot in PHD drifts above the midline in the graph, and the “Polar alignment error:” indicator at the bottom left of the graph shows a negative number), you should initially try to adjust your guide star to drifting one to two arcseconds in the positive (red plot in PHD drifts below the midline in the graph, and the “Polar alignment error:” indicator at the bottom of the graph shows a positive number). (NOTE: If you are pointing west, these directions may be reversed.) Let it drift for about 30 seconds, and when the polar alignment error indicator and trend lines settle, place another bookmark.
Note: You may find that your first adjustment simply makes your original alignment of 2-5’ even worse. This simply means that you need to adjust the opposite direction. It is important to look for this, as knowing which direction to turn your azimuth or altitude adjustment knobs is important to quickly dialing in an accurate alignment.
You now have “bookends”, as I call them. These two points should be your absolute outer boundaries. If you make any adjustment to the star that pushes it beyond these two points, you are pretty much guaranteed to end up with a worse polar alignment. Somewhere between these two points is a perfect polar alignment. The task now is to refine your alignment and use additional bookmarks to tighten the range within which you will find that perfect polar alignment.
Refinement
Now that you have your bookends, you need to make another adjustment. If you started out with your first bookmark at around -2’ PA, and your second one at around -1’ PA, then you know that roughly midway between those two points is an accurate polar alignment. The simplest approach to making the next movement of your guide star is to move it midway between the first and second bookmarks. My recommendation is to try to move it close to, but not exactly to, the midway point. If the star is currently at bookmark 2, move it about 3/8ths of the way back towards bookmark 1.
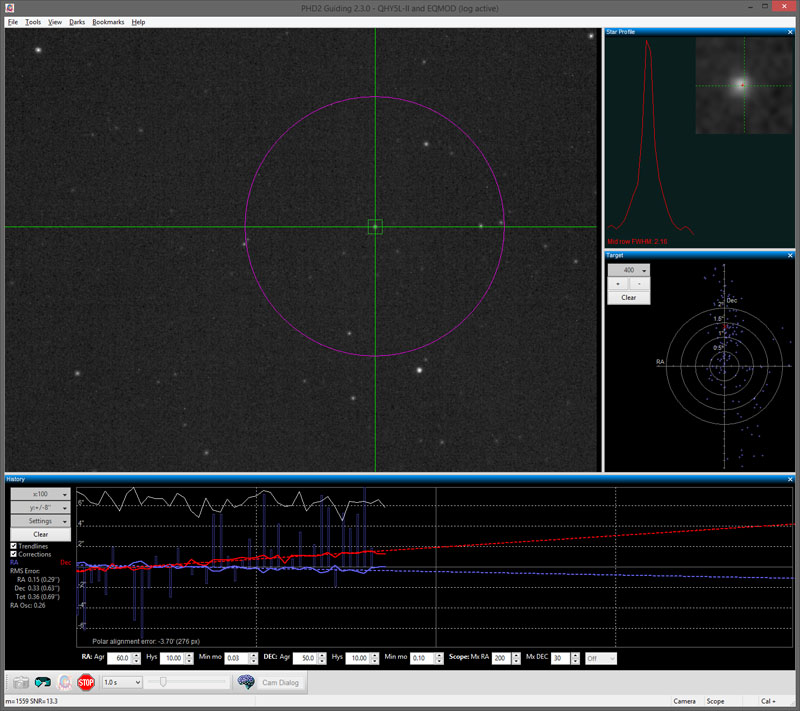
Do some drift, and check your alignment. You may need to drift for a minute or two to get an accurate read. You should find that your PA is less than 1’ now, and if you’re lucky, it should be less than 0.5’ (30”):
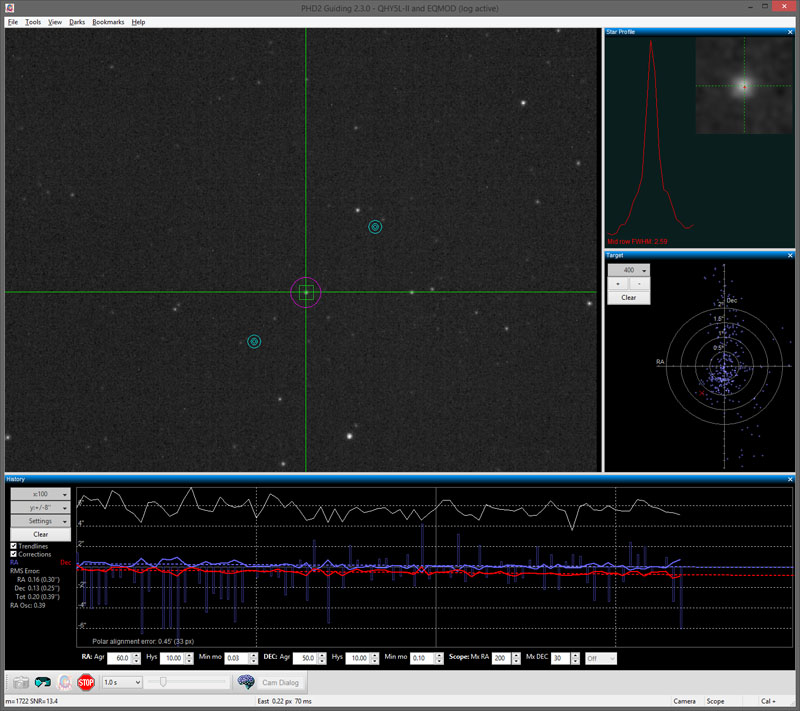
Click the Adjust button again, use SHIFT-B to set a third bookmark. You should now have three bookmarks, with the third in-between the first two within the range for polar alignment. You should also notice that the pink PA adjustment circle is quite small, compared to originally when it was quite large (in the case of this tutorial, it started out almost larger than the entire field of view at over 9’ polar misalignment.)
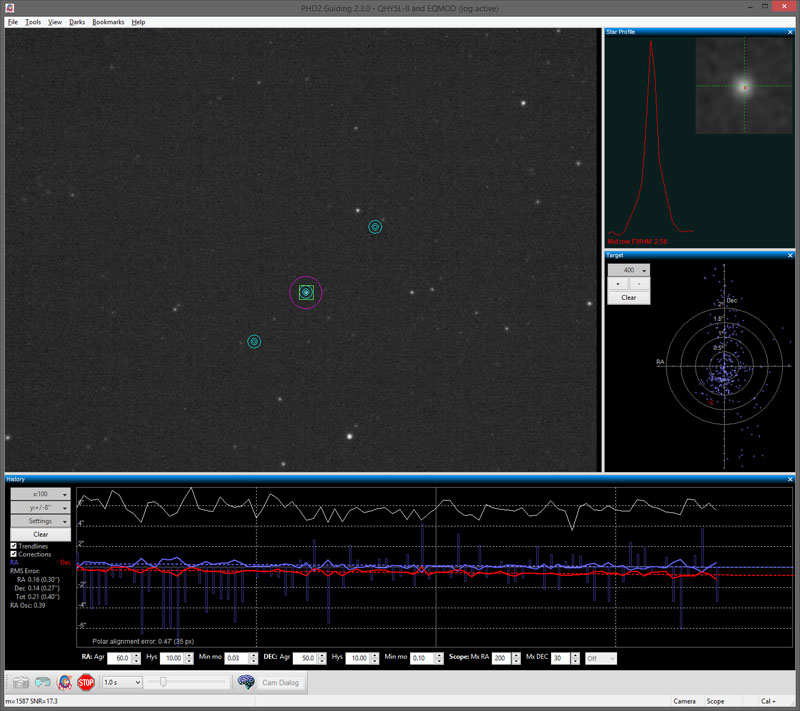
Now, which direction you move the star next depends on the direction it was last drifting. If you started out with -2’ PA, then moved to +1’ PA, then moved about 3/8ths of the way back to bookmark 1, you should be around +0.5’. That means you would still want to move the guide star towards bookmark 1. If, for whatever reason, you noticed that your PA was something more like -0.5’, then you would want to move the guide star back towards bookmark 2.
Making this determination for which direction, between which two bookmarks, to move the guide star is critical each time you set a new bookmark, and are ready to make another adjustment. You need to know which two bookmarks define your “range” within which a better polar alignment may be found. With practice, it will become second nature to gauge the direction in which your guide star should be moved to improve your polar alignment, but for now, the general procedure laid out in the previous paragraph is how you make that determination. Assuming that your PA was off by +0.5’ at your last bookmark, make another small move towards bookmark 1 with your azimuth knobs. This move should be very small:
Your polar alignment, at this point, should be around 0.5’ or less. As such, your drift will be very low, and may already be acceptable to you. If so, you can simply call it good here, and start working on your imaging session. If you want to really eliminate declination drift as an issue (you may have persistent issues guiding in dec, your mount may simply not guide in dec well as in the case of the Celestron AVX mount, etc.), you can keep refining. You will need to drift for longer. About two minutes drift or more with this level of accuracy is necessary to really see which direction your drifting, so you know which direction to adjust.
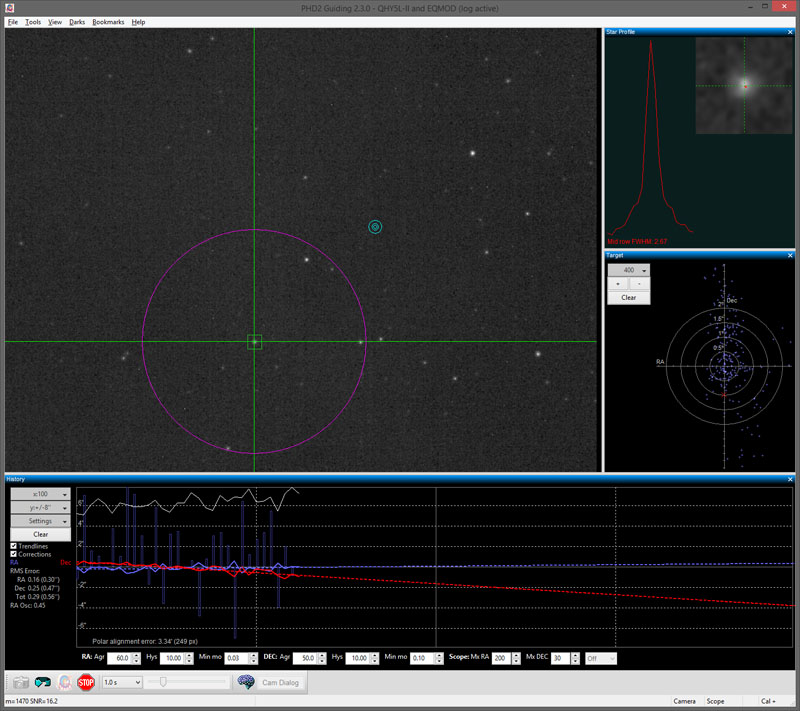
Drift for a few minutes, click adjust and place a bookmark, then make an adjustment in the appropriate direction. Each successive bookmark should get closer together, and the location of a true, perfect polar alignment should start to become clear. If it does, it should become quite obvious exactly where you need to place your guide star to get a highly accurate PA. Do so, and you should be able to forget about guiding in DEC at all for the nights imaging session. Here is the fifth move of the guide star, resulting in a polar alignment of 0.19’:
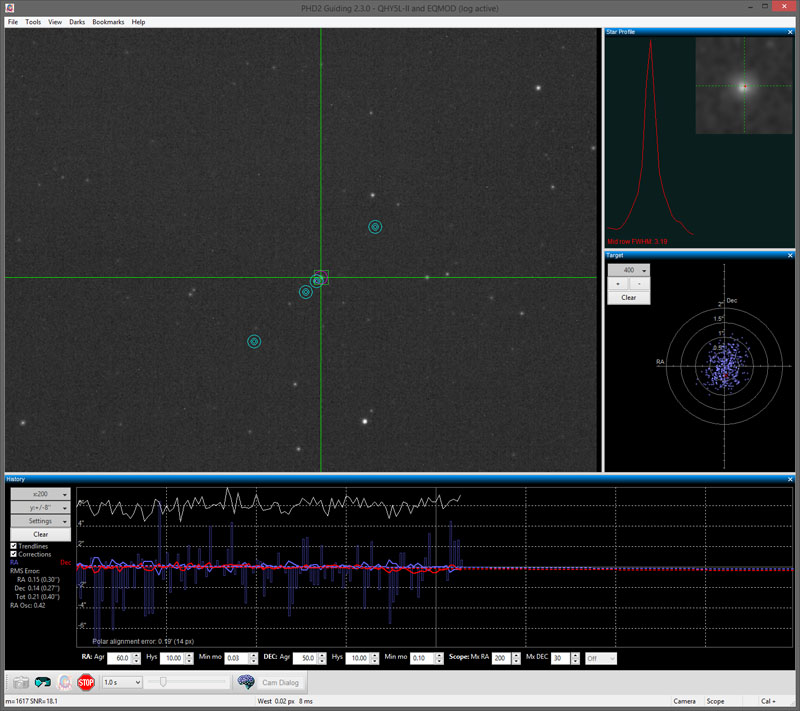
I wanted to see if I could dial in an even better alignment, so I made one final move, and let the star drift for a longer time to get a better read on the alignment. Final PA for this session ended up being 0.05’, or 3”:

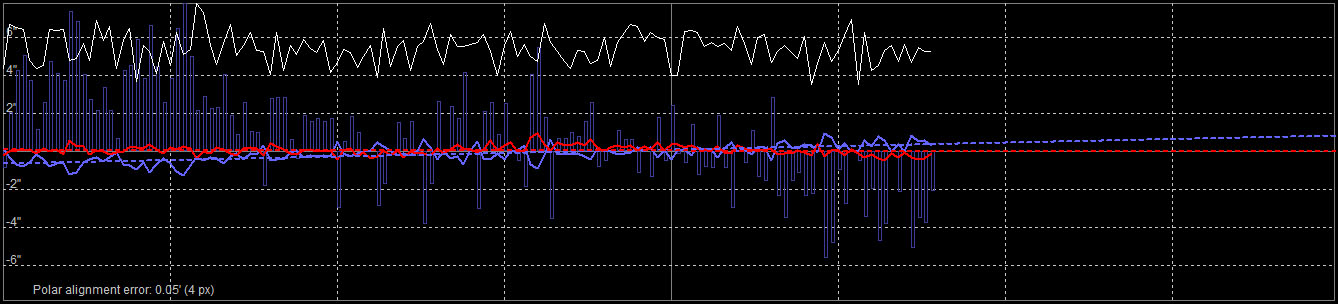
Here are some full views of the PHD guide graph, showing the alignment and drift of the star over a period of several minutes:
It can also be useful to check the target graph, which is point sampling plot of the star centroids over time. I like to set it to 400 samples, to get a good statistical read, and gauge how the samples are distributed. In this case, over a period of about three minutes, the rough peak-to-peak distribution of the plots is about 2”, since the vast majority of the points fall within the 1” circle:
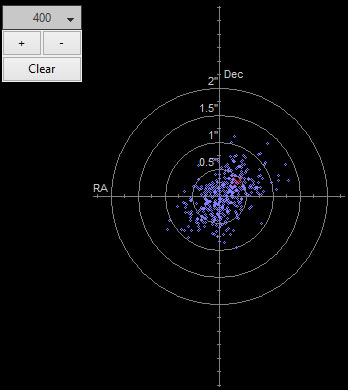
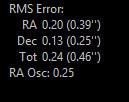
A significant amount of the points in this plot are within the 0.5” circle as well. If your exposures are less than three minutes, then you probably couldn’t hope for better than 1” P2P guided tracking. Finally, I also like to check my guiding RMS. If the overall is less than 0.5”, I consider that very good for shorter focal lengths (<1000mm) (I honestly don’t yet have enough experience with imaging at longer focal lengths to say how good it may be for imaging at say 2000mm or so.) In this case, it is 0.45”. DEC RMS is 0.25”, and RA RMS is 0.39”:
These are excellent for guiding alone. If you program and enable a PEC curve, these numbers should improve further, down into the 0.2x” range for everything, as PEC will take care of some significant sources of error, leaving behind more minor stuff.
Caveats
Sometimes, once you start to dial in a really tight polar alignment, things stop behaving logically. You may expect that making a small adjustment in one direction will improve your PA…however once you make that adjustment, things seem worse. There can be a number of causes for this. For one, drift aligning on a night that has a consistent breeze, or any amount of wind faster than that, especially if it’s gusty, can make drift alignment quite a frustration. I’ve found that trying to dial in a PA better than 1’ on such nights is usually a fruitless endeavor, although with persistence, getting somewhere between 0.5’-0.75’ can be done.
Sometimes, the relatively fast frame rate of 1s can become problematic at a finer drift scale. When your PA gets below 0.5’ (30”), you may want to reduce your frame rate to 2s. This should help alleviate seeing as a factor, and your drift should be more consistent. You will need to allow the star to drift for several minutes at least when doing this, in order to get an accurate read, but it can and usually will be much more accurate. It just slows down the process.
Balance can play a big role in how easy it is to dial in polar alignments more accurate than 0.5’ as well. You need to make sure that the worm and ring gear in your declination axis remain engaged. If your imbalance is not significant enough, you may still experience what I call “declination bounce”, where your ring gear’s teeth effectively “bounce” off the worm teeth. This becomes a greater problem when your pointed close to the zenith…so if your meridian/CE junction is closer to the zenith, you may find that you need a greater amount of declination imbalance to eliminate bounce as a problem. Bounce will usually manifest as an oscillation in dec around the midline of the PHD2 graph. If you let your star drift for long enough (many minutes), you’ll eventually get an accurate read on your PA, and it may be quite good. Bounce simply increases the amount of time it takes to finish the drift alignment process, and in the long run, it can worsen your overall tracking performance in DEC (which kind of defeats the point of having such a good alignment in the first place).
Finally, you may find that you have some drift in RA. A good drift align session will usually have bookmarks all lined up, probably along some diagonally oriented, but otherwise strait, vector. If your drifting a bit in RA, then your might find that your bookmarks also drift a little bit, along the diagonal oriented 90 degrees perpendicular to the angle of your azimuth adjustments. This isn’t a huge problem, but if the movement is significant enough, it can make it a little more difficult and time consuming to find that perfect spot where a really accurate polar alignment exists.
If you plan to perform drift alignment in altitude, the last thing I’d stress is that you do your best to point as close to the horizon/CE junction as possible. If you point too far away from that point in the sky, PHD’s readings tend to lose accuracy. Point more than about 20 degrees away from that point in the sky, and PHD’s readings effectively become useless, as your drift will reflect both azimuth and altitude. Making “corrections” in altitude for that kind of drift has the potential to throw out your azimuth alignment.
It may simply be luck, but I have found that my altitude alignment is not as important as my azimuth alignment. It may simply be that I dialed in a very good altitude alignment in the past, and it has stuck (the dial on the mount itself certainly seems to be pointing at almost the exact altitude I live at, 39 deg 58 min north, just a hair less than 40 deg north.) If you do not have a good altitude alignment, the closer you can find a guide star near the horizon/CE junction, less than 20 degrees away, preferably about 10 degrees away to allow for some lead time before the star disappears below the horizon, but close enough for an accurate read, the better. +


