Last Updated on December 10, 2021 by Practical Astrophotography Staff
Astrophotography Tools has been the go-to choice for many imagers who use both Digital SLR as well as CCD and CMOS cameras.
APT stands for “Astrophotography Tool” and it is like Swiss army knife for your astro imaging sessions. No matter what you are imaging with – Canon EOS, Nikon, CCD or CMOS astro camera, APT has the right tool for planning, collimating, aligning, focusing, framing, controlling, imaging, synchronizing, scheduling, analyzing and monitoring. All its features are packed in an easy and comfortable to use interface with design that had no alternative back in 2009 when it was released. Since then APT is constantly being improved and refined by the real experience of many astrophotographers from all over the world including one of the APT authors.
Currently APT works on MS Windows XP, Vista, 7, 8, 8.1 and 10. This excerpt taken directly from the Developers’ website is a pretty good description of exactly what you will find when using APT. There are numerous seasoned Astrophotographers who use APT rather than other expensive packages such as Sequence Generator Pro or Software Bisque’s The Sky X, not saying those are any less capable but APT’s simplicity is definitely a major factor when using a image acquisition software. The cost 18.70 Euro, of APT is another factor beginners consider when choosing a software like this to start with. The; developer Ivo is very responsive to feature suggestions and has put in place a number of changes in each successive version update. APT is truly an All-in-One software package for Astrophotographers.
1.) Check List Screen
This is the main screen presented to the user when the program is started. Here you are given various “Check Lists” to help make life easier when setting up to image. You can change these and add new “Check Lists” as you like. You choose to see this screen every time you start the program or dismiss it by choosing to no longer see it on startup at the lower left side of the tip screen. Click “OK” and this screen will close.
2.) Camera Connect
This is the camera connect screen you will see after clicking on the camera tab in the upper left corner. You can connect a DSLR, CCD or CMOS camera. The CCD and CMOS cameras are under the same bullet. You can also set your Bayer preview here. Once you connect your camera the software will remember your choice the next time you start the program making it easier and one less step to complete at the beginning of each imaging session.
3.) Settings Screen
One of the first screens you should set up is the settings screen. Here you will find the ability to change the screen color from Grey to Red for Night vision. You can also find your locations settings, accessories settings such as a focuser, filter wheels and sound. You can set your own sounds if you do not care for the male or female voice calling out events. You can also mute the sounds by clicking on the speaker icon just right of the time readout.
4.) Live View
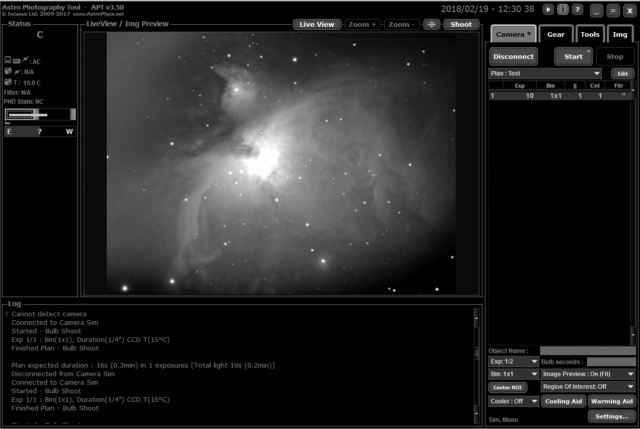
APT has a great Preview feature that allows you to see your target, use it to frame the shot and to also focus real-time. In order to see what you are imaging and to start focusing your image, you can click on the ‘Live view” button. This will bring up a Live View of what your scope is viewing and refresh the images based on what your exposure is set at. To change the exposure you can click the drop-down in the lower right-hand corner and choose an appropriate setting.
5.) Focusing
Under the Tools tab you will find a host of tools that can aid you in your imaging session. Among them is a Focus Aid, Bahtinov Aid, Auto-Focus Aid and Pixel Aid. The most useful for manual focusing is the Focusing Aid tool. By clicking on the button you are given a screen in which you place the preview box over the star you want to focus. This will display a readout of your FWHM current and Best readout with an option to reset values. You can also use the Magnifier tool to help make sure it is in focus
6.) Adding/Editing Plans
Once you have your stars in focus you can start imaging with your setup. Once you choose the Camera tab you will need to set up an exposure plan. Click on the drop-down and choose “test” underneath the Light Plans and then click Edit. Here you can set the Plan name, exposure bin, pause, and # of each exposure by “adding as new” or “update the current” plan line. We recommend that you create several plans for later use so that you can maximize your imaging time. See Appendix Image
7.) Imaging
Once you have your Plan set up and saved you will see it on the right side of the screen. To start imaging click on the “Start” button and your plan will run through its course. You can pause the plan by using the Pause button Depending on the plan you have setup you will hear audio alerts based on when an exposure has started or ended. This is a nice feature if you like to walk away from your computer during long imaging sessions. If this becomes too much of a distraction you can go back into your settings screen and change the sounds.


